Trashcan Frito Nachos are my new favorite way to make nachos! Layers of Fritos stacked on top of each other so you get all the toppings in every bite!

A Fun Nacho Recipe For Parties
Let’s take nachos and make them better. Not just better but epic. Epic nachos. How do we do that?
Well, first we use Fritos instead of tortilla chips. Nothing wrong with tortilla chip nachos, I make them all the time like these Chicken Sheet Pan Nachos.
But we’re making epic nachos today… so I’m using Fritos instead.
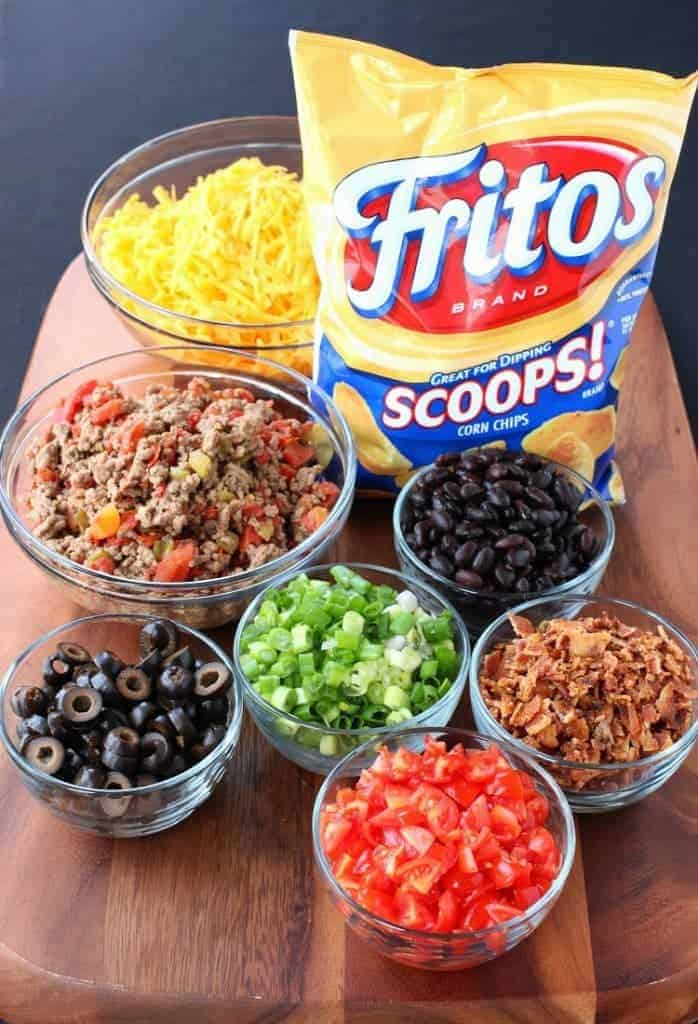
Fritos and bacon, scallions, tomatoes, olives, the meat filling and of course tons of cheese. But you can add whatever toppings you like too…
I’m not going to lay them out on a sheet pan either…I’m going to use a pan like this one – Springform with Extra High Ring – and I’m going to make a multi-layered nacho tower.
What’s “epic” about these Trashcan Frito Nachos is that you get all the toppings in every bite, because they’re stacked with layers and layers of beef and cheese and beans all the way to the top.
How To Make Trashcan Frito Nachos
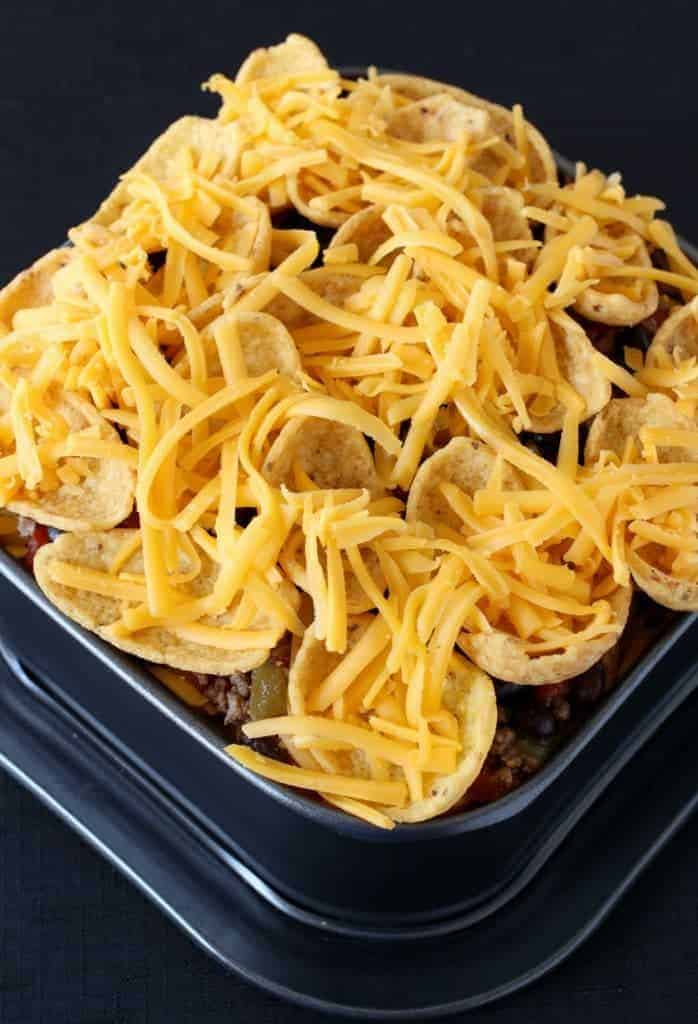
Make a quick ground beef filling and then start assembling the nachos. Just make sure to alternate every layer with a top and a bottom coating of cheese so these Trashcan Frito Nachos stay together.

And then of course you’re going to end with the cheese on top.
I know that you guys probably aren’t going to have that on hand so I gave you a link for the type of pan you can grab. If you have an extra large coffee can that’ll work too, just spray the inside with cooking spray before you start your layers.
Don’t worry about perfection here, these Trashcan Frito Nachos are meant to be messy. And the messier the better if you ask me. Grab a few cold ones, sit down and get ready to be blown away.
These Trashcan Frito Nachos are crazy good, totally addictive and yes – they are epic.

Looking For More Fun Appetizers?
- Naked Sheet Pan Tacos
- Taco Egg Rolls with Avocado Cream Sauce
- Honey Mustard Pulled Pork Taquitos
- Copycat Totino’s Pizza Rolls
- Sloppy Joe Big Mac Sliders
Want to save this recipe? Enter your email below and we'll send the recipe straight to your inbox!
You'll also sign up to get new recipes in your inbox.

Trashcan Frito Nachos
- Prep Time: 15 minutes
- Cook Time: 20 minutes
- Total Time: 35 minutes
- Yield: 6 Servings 1x
These fun nachos are made with Fritos instead of tortilla chips! Perfect for sharing with friends or for serving at parties!
Ingredients
- 1 tablespoon olive oil
- 1 lb. ground beef
- 1 tablespoon taco seasoning
- 1 teaspoon salt
- 1/2 teaspoon fresh ground black pepper
- 1 teaspoon garlic powder
- 10 oz. diced tomatos, drained
- 4.25 ounce can green chilies
- 1 lb. bacon, cooked and chopped
- 1 15.5 ounce can black beans
- 2 – 9.25 ounce bags Fritos Scoops
- 6 cups shredded cheddar or jack cheese (or a combination)
- 1 bunch scallions, chopped (for garnish)
- 1 2.25 ounce can sliced olives (for garnish)
- Sour cream and guacamole for garnish
Instructions
- Preheat the oven to 375 degrees.
- Start by browning the beef in a large skillet with the olive oil. Once the meat is browned, add the taco seasoning, salt, pepper and garlic powder and then stir to combine.
- Pour in the diced tomatoes and green chilies, stir to combine and remove from the heat.
- Place a high sided springform pan onto a baking sheet lined with foil, and then add a layer of Fritos to cover the bottom completely.
- Next add a layer of the beef, a layer of cheese, some of the olives, black beans and bacon, then more cheese.
- Now another layer of Fritos and repeat the toppings, ending with a layer of cheese to stick to the next Fritos layer. The top layer is Fritos, then cheese.
- Press down slightly on the filling before putting it into the oven.
- Cook for 20 minutes until the cheese is melted. If the top starts to get too brown you can cover it with foil until it’s ready.
- Let cool for a few minutes until you can handle the mold to remove it. You might have to get a knife around the edges to loosen it up then lift it straight off the top.
- Garnish with scallions, olives, sour cream and guacamole
- Category: Appetizers
- Method: Oven
- Cuisine: American / Tex-Mex


I loved it and so did the family!! Thank you.